Advanced Jumps & Stunt Mastery: Complete Air Control Guide
Conquer PolyTrack's most thrilling stunt tracks with expert jump mechanics, precise air control, zero-loss landings, and the airbraking technique that top players use to dominate stunt leaderboards.
Advanced Jumps & Stunt Mastery: Complete Air Control Guide
The gap between "decent" and "great" at stunt tracks = jump technique. This guide closes it.
Stunt tracks are PolyTrack's most spectacular category—and the most punishing. A single bad landing on a 15-jump track costs 2–4 seconds. Top players nail 13 of 15 jumps consistently. Average players nail 8. This guide covers the physics, technique, and practice methodology to reach that elite tier.
What You'll Learn:
- ✓ The physics of PolyTrack jumps (what actually happens at takeoff and landing)
- ✓ Ramp boost prediction and the 2025 engine speed bonus
- ✓ Zero-loss landing technique (4-wheel flat landings)
- ✓ Air control: when to tap, when to hold, when to do nothing
- ✓ The airbraking technique (most underused time-saver)
- ✓ Wall bounce recovery for when things go wrong
- ✓ Track-specific jump strategies
Skill Level: Beginner to Advanced Estimated Mastery Time: 2-3 weeks focused practice
The Physics of PolyTrack Jumps
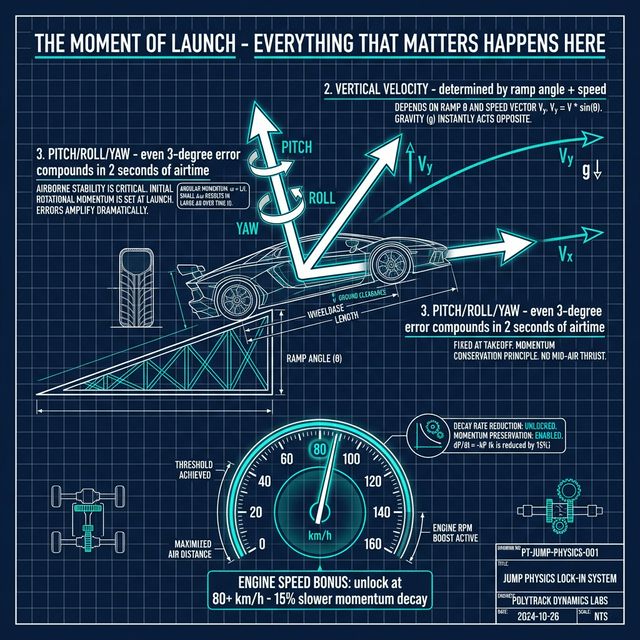
Understanding the physics is non-negotiable. Players who treat jumps as "just go fast and hope" plateau immediately.
What Happens at Takeoff
When your car leaves a ramp, three factors lock in simultaneously:
1. Horizontal Velocity: Your forward speed at launch (in km/h). This is your "floor." You cannot gain horizontal speed in the air.
2. Vertical Velocity: Determined by the ramp angle AND your horizontal speed. A 30° ramp at 80 km/h produces significantly more vertical velocity than at 60 km/h.
3. Pitch/Roll/Yaw: The car's rotation at the moment of launch. Even a 3° pitch error compounds dramatically over a 2-second airtime.
The critical insight: your job before the ramp is over. Everything that matters for the jump happens in the last 10 meters of approach. This completely changes how you should think about jump preparation.
The Engine Speed Bonus
In PolyTrack's 2025 physics update, a speed bonus triggers at 80 km/h+ takeoff velocity. When your car leaves a ramp at 80+ km/h:
- Horizontal momentum decays 15% slower in the air
- Landing stability window is 20% wider
- "Perfect landing" detection is more forgiving
Practical impact: if you're taking a ramp at 75 km/h vs. 82 km/h, you're not just 9% faster—you're experiencing a fundamentally different physics response.
How to consistently hit 80+ km/h on ramps:
- Never brake in the 5 pieces before any ramp
- Use boost pads when available (aim to hit them centered)
- On approaches with curves, drift through the curve to maintain momentum (don't grip-slow through it)
What Happens at Landing
Landing physics have two phases:
Phase 1: Compression (the moment of contact): Your suspension absorbs the impact. The car briefly loses 5–25% of its speed depending on landing angle.
Phase 2: Rebound (the next 0.3 seconds): The car "bounces" slightly before fully settling. During this phase, your steering is 40% less effective.
The goal of advanced landing technique is minimizing Phase 1 compression AND not fighting Phase 2 rebound with aggressive corrections.
Zero-Loss Landing Technique
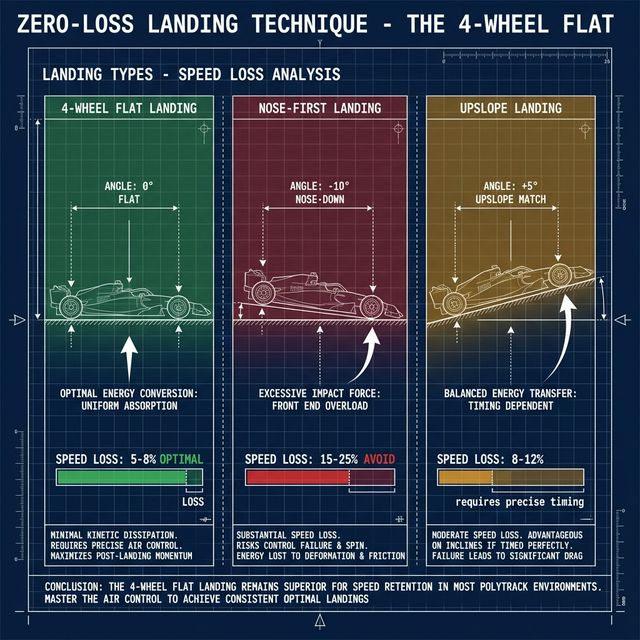
The single highest-impact technique improvement for stunt tracks.
The 4-Wheel Flat Landing
A perfect landing has all four wheels touching the ground simultaneously, with the car's pitch matching the landing surface angle.
On a flat landing zone:
- Car should be nearly level (±3° pitch acceptable)
- All 4 wheels contact within 0.05 seconds of each other
- Speed loss: 5-8% (vs. 15-25% for nose-first landing)
On a downslope landing zone:
- Car should be slightly nose-down (matching slope angle)
- Front wheels contact first, but by <0.1 seconds
- Speed loss: 3-5% (downslopes absorb impact better)
On an upslope landing zone (the hardest):
- Car must be slightly nose-up to avoid nose-diving into the slope
- This takes precise timing in the last 0.5 seconds of airtime
- Speed loss: 8-12% even with good technique
The Pitch Correction Window
After leaving the ramp, you have a 0.5–1.5 second window to adjust your pitch before landing (depending on jump distance). Here's how to use it:
Nose-high scenario (common when hitting ramp at high speed):
- Gently tap and release the brake (0.1–0.15 second tap)
- The brake creates drag on rear, bringing nose down
- This is the "airbraking" technique—covered in detail below
Nose-low scenario (common when hitting ramp at low speed):
- Gently tap the accelerator
- Slight throttle input shifts weight toward rear wheels
- Brings nose up
Rolling scenario (car twisting sideways in air):
- Combined steering input in the opposite direction of roll
- Use 20% of the steering intensity you'd use on the ground
- DO NOT overcorrect—light taps only
The Airbraking Technique
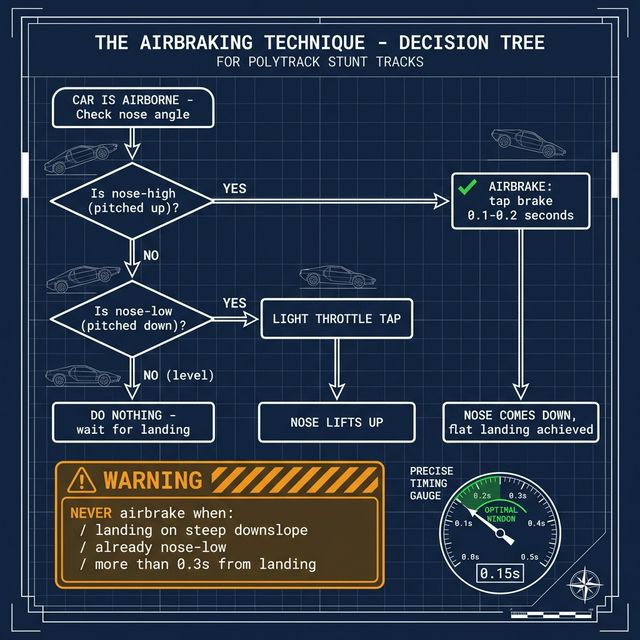
This is the #1 most underused time-saving technique in intermediate play. Even experienced players often miss this.
What Is Airbraking?
Airbraking is briefly tapping the brake button while airborne—NOT to slow down (you're in the air, there's no ground friction) but to shift weight forward, which brings the rear wheels down faster and flattens your pitch.
The mechanics:
- Brake input while airborne applies virtual "engine braking"
- This creates a slight backward rotation around the car's center of mass
- Result: rear wheels drop relative to front wheels
- Net effect: flatter landing angle, faster grip regain
When to Airbrake
✅ Use airbraking when:
- You're nose-high and approaching a flat or slightly downsloped landing
- The jump was longer than expected (carried more speed into ramp than planned)
- You need to land quickly after a short jump (reduces airtime on flat jumps)
❌ Never airbrake when:
- Landing on a steep downslope (you'll overshoot flat and crash nose-first)
- You're already nose-low (makes it worse)
- You're mid-air more than 0.3 seconds from landing (too early to have precision)
Airbrake Timing Precision
The tap duration is critical: 0.1–0.2 seconds maximum.
- Under 0.1s: Too brief to achieve meaningful rotation
- 0.1–0.2s: Optimal—smooth pitch correction
- 0.2–0.3s: Starts to over-rotate, may create nose-down issue on exit
- Over 0.3s: Significant air speed loss AND over-rotation. Never do this.
Practice Drill: The Airbrake 5
Find any community track with 5+ medium-height jumps over flat surfaces.
Drill: On every single jump, practice airbraking even if you don't need to. The goal is building muscle memory for the timing.
Judge success by: do your landings look visually flatter? Does your car accelerate more smoothly after landing?
Success metric: 4/5 consecutive flat landings using airbrake technique = Technique acquired
Advanced Air Control
Once zero-loss landings are consistent, these refinements add the final edge.
The Pre-Launch Steering Adjustment
Done in the final 0.2 seconds before leaving the ramp:
When approaching a ramp with a left turn immediately after landing:
- Apply 5–10% left steering while still on the ramp
- Carry this slight yaw angle into your airtime
- The car is already angled toward the next section on landing
Time saving: 0.1–0.3s per corner-after-jump, by eliminating the "straight then turn" movement.
Warning: Too much pre-rotation causes spinning. Err on the side of less. This technique requires ramp-specific calibration.
Mid-Air Recovery After Mistakes
When things go wrong mid-air:
Scenario 1: Off-axis spin
- Steer opposite to rotation direction with 15–25% input
- Do NOT brake (amplifies spin) or accelerate full (also bad)
- Feather throttle at 20% while correcting spin
Scenario 2: Too much speed (overshot landing zone)
- Accept it. Don't brake desperately.
- Aim for the next available landing surface
- If there's a wall: approach at 30–45° angle to use it as a bumper
Scenario 3: Completely off-track
- Use checkpoint respawn and analyze what caused the error
- Most common cause: approaching ramp at an angle vs. center
The Wall Bounce Recovery
A technique borrowed from TrackMania that works beautifully in PolyTrack.
When you're heading toward a wall at speed and recovery is impossible:
- Approach at 40–50° angle to the wall (not head-on)
- Feather throttle to 20–30% on contact
- Steer away from wall immediately on contact
- The car "bounces" and redirects more predictably than hitting straight-on
Time cost: 0.5–1.5s (vs. 3–10s for a reset) Use case: Any crash you can predict 0.5+ seconds in advance
Jump Technique by Track Obstacle Type
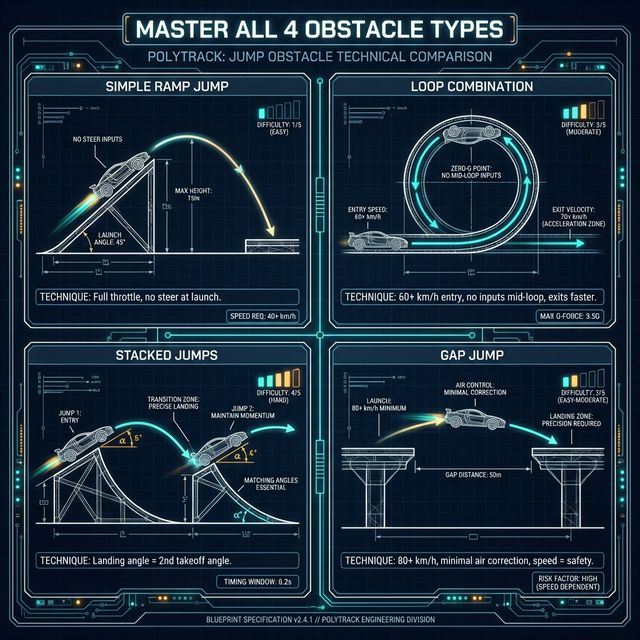
Simple Ramp Jumps (Most Common)
Approach: Full throttle, centered on ramp, no steering input for last 3 pieces Airtime: Track car pitch, minimal corrections needed Landing: Aim for 4-wheel flat, light airbrake if nose-high Common error: Steering during ramp approach causes yaw deviation
Loop Combinations
Loops are not "jumps" but contain the takeoff/landing physics principles.
Entry requirement: 60+ km/h minimum, 80+ km/h for maximum flow Mid-loop: Do not apply any steering or braking (this is where most people lose speed) Exit: The exit point of a loop has compressed suspension—expect slight speed boost
A loop at 80 km/h exits at approximately 85–90 km/h due to the momentum rotation effect.
Stacked Jumps (Jump → Ramp → Jump)
The highest skill ceiling obstacle type. You land on a ramp, which immediately launches you again.
Key insight: Your landing angle determines your SECOND takeoff angle. A nose-down landing on an upward ramp gives a steeper second trajectory than a flat landing.
Strategy: Land slightly nose-down for maximum second jump distance. Land flat for maximum second jump stability.
Practice approach: Drill this obstacle type in isolation using the track editor. Build a custom 3-piece test with ramp-flat-ramp to repeat the combo endlessly.
Gap Jumps (No Landing Ramp)
The most punishing obstacle type. Missing a gap jump usually means reset or long time loss.
Technique:
- Prioritize approach speed (80+ km/h)
- Minimal air correction (corrections risk missing the gap)
- Touch the nearest edge of the landing surface, not the center
Mental approach: If you're uncertain you can make the gap, you're going too slow. Speed is your friend on gap jumps.
Practice Progression: Stunt Track Mastery
Stage 1: Foundation (Week 1)
Goal: Consistent flat landings 7/10 times on simple ramp jumps
Daily Drill (20 minutes):
- Find an Easy stunt track with 5–8 simple jumps
- Run it 20× focusing only on landing quality (ignore time)
- After each run, rate each jump: Clean / Nose-up / Nose-down / Crashed
- Target: 7+ Clean ratings per run before advancing
Metrics to track:
- Clean landing rate (target: 70%+ before Stage 2)
- Worst obstacle type (this is your drilling focus)
Stage 2: Technique Integration (Week 2)
Goal: Consistent airbraking, clean landings 85/100 times
Daily Drill (30 minutes):
- Choose a Medium stunt track
- First 15 min: Practice airbraking on every jump, not caring about time
- Next 15 min: Run for time, using airbraking only when needed
Metrics to track:
- Time compared to Week 1 baseline on same track
- Number of airbrakes per run (optimal: 2–4 on a 10-jump track)
Stage 3: Competition Readiness (Week 3+)
Goal: Top 20% leaderboard time on a chosen Hard stunt track
Session Structure:
- Warm-up: 3 laps on an Easy track, focus on technique
- Scouting: Load top leaderboard ghost of your Hard target track
- Segment drilling: Focus on the 2 worst jump sequences
- Committed runs: 10–15 attempts with full commitment
Stunt Track Selection Guide
For beginners learning jumps: Look for tracks rated Easy with 5–10 jumps and no gap jumps. These build fundamental technique without punishing errors too harshly.
For practitioners: Medium stunt tracks with 8–15 mixed jumps including at least 2 loop combinations. The variety builds adaptive technique.
For mastery validation: Hard or Impossible category stunt tracks. These were designed by expert creators who understand exactly which techniques are required and tested. Completion = mastery proof.
Ready to fly?
Practice these techniques on our community stunt tracks. Browse by difficulty:
- Easy Stunt Tracks — Build your foundation
- Technical Track Collections — Mixed challenge
- Speedrun Strategies — Turn your technique into times